
 This tutorial is for quilters—who have sewing machines, thread, hand scissors, and rotary cutting tools—and know how to use them. Most of the photographs can be clicked to enlarge them. Back arrow to return to the text.
Step 1: Fabric Procurement & Preparation
 Head for your local Goodwill, Salvation Army, Purple Heart, second hand, resale shop, or thrift store. (My favorite one in the area happens to be called “Thrift Store!”) On the way in, look for a sign that tells what color tags are on sale. Most thrift stores either staple little squares of colored paper to each garment with the price, or they pierce the garment with a colored plastic “whatzit” that looks something like this:
|——————————————-|
Some use a clear plastic “whatzit” to affix the colored paper tag to the item. These are the colors they are referring to in the sign. The last time I was in, green tags were 50% off and blue tags were 75% off. (Colors change weekly.) Huge savings!
 I picked up about 27 long-sleeved shirts for just under $50. That’s a good start.
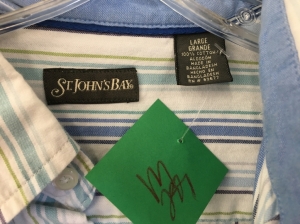 I ignored anything not on sale. It has to be 100% cotton, and I won’t waste my time with anything smaller than a size LARGE. Stay away from flannel (ravels too much), thick or lumpy fabric (too hard to deal with), shirts with darts or seams in the back (pleats are fine), or shirts you just can’t stand to look at (they won’t look any better in your rug). I don’t do repeats, at least not intentionally. The more colors, the merrier, as long as they all go together. (In the picture above, you can see the clear “whatzit” holding the green tag to the shirt. M is for Men’s shirt and the price is $2.99.) Except I paid $1.50. Cha-CHING!
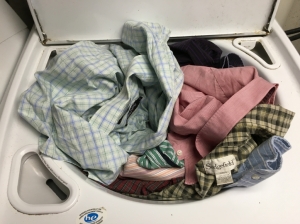 I go from shopping bag to washing machine as soon as possible, and wash in hot water. (De-tag first.) Dry on hot. It’s doubtful that you’ll get any color migration (these have all probably been washed many times before) but just in case throw in a color catcher. (Don’t load your washer quite this full. I was being cute for the camera.)
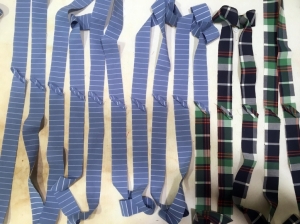
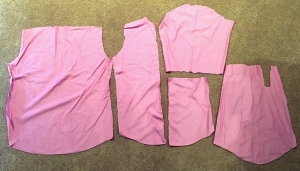 Next, “fillet” or deconstruct the shirts. That is, cut them apart with hand scissors and harvest the pieces you can use in this project. If you’ve got a straight seam (front of the shirt where the buttons and button holes are) feel free to rip. Don’t bother to cut off the shirt hem, however side seams should go.
The largest piece is the shirt back. If you’re in a hurry to start, grab the back and leave the rest for later. You’ll be cutting crossgrain (side-to-side, perpendicular to the stripes) so you’ll get the longest strips from the back. Notice that I cut the front side (with the pocket) in half. I saved the pocket and fabric around it for another project like this quilt. You have a choice with the sleeves. I whacked off the cuff and placket on one, and I carefully cut out the placket on the other sleeve. It’s faster to whack off the cuff as you’ll only glean a small amount of fabric if you cut around the placket.
It’s hard for me to throw anything out, so I wad up what’s left and bag it. Leftovers can be used to make quilts like these. Or these!
 On this “Shirt Quilt,” I buttoned shirt cuffs one to another for the border and covered the raw edges with front placket pieces. (Sorry the photo isn’t the greatest; I made this quilt before I got a good camera.)
Step 2: Acquisition of Supplies
In addition to shirt fabric, you’ll also need:
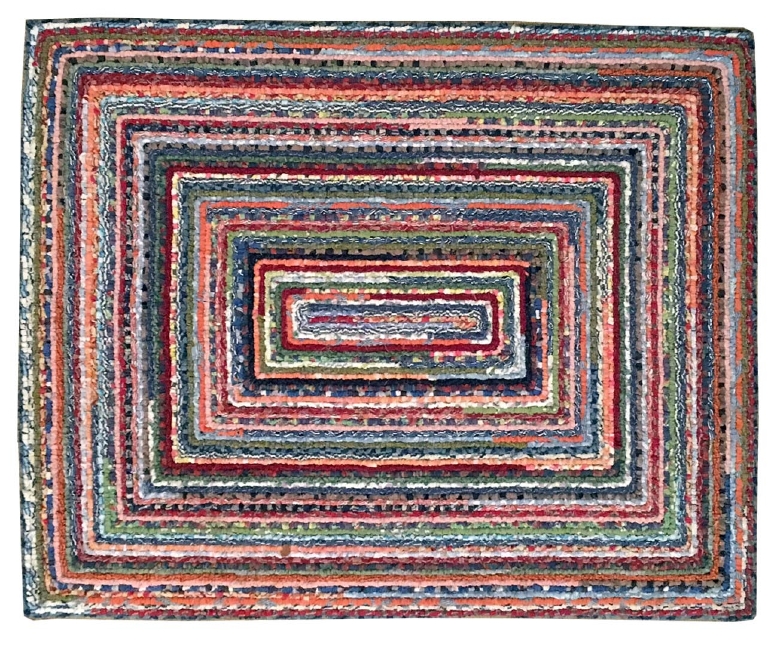
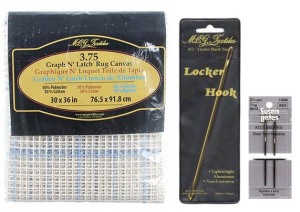 1. Rug Canvas (3.75 mesh). A 36″ x 30″ canvas will yield a rug about 34″ x 28″ which is the size of my rug pictured above.
2. Locker Hook. It’s a crochet hook at one end with a very large eye on the other.
3. Yarn Needle. Perfect for beginning and for finishing the rug. It has a huge eye and a blunt point.
![]()
4. Porcupine Quill. Excellent tool to open holes in folded canvas to allow needle and locker hook to pass through those tight places. A high-end, very pointy chop stick will also work, but it’s not nearly as smooth. Porcupine quills make excellent stilettos too, helpfully pushing wandering quilt patches under your presser foot. Unlike metal stilettos, if the sewing machine needle accidentally hits the quill, the needle will go right through it rather than break off the needle.
Visit Amazon.com for most of the supplies listed above. * Scroll until you find Locker Hooking Supplies.
 5. I also found these Arm & Hammer “rubber-dipped” gloves extremely helpful. I wear just one: on my locker-hook-grabbing hand. (Look in the $1 stores, or places they sell gardening/work gloves.) The rubber adds significant and necessary padding to the palm and fingers. Without the glove I had finger cramps and bruised a finger so badly I had to stop “hooking” for 6 weeks until it healed!
6. A pair of tweezers are handy when sewing the canvas and to adjust fabric tension as you hook.
 7. You will also need a yard or two of black, navy, or other dark BATIK fabric. While it shouldn’t ever show, dark is better than light if something were to go wrong and it did show. Wash, dry, and iron the fabric. Cut it into 1/2″ wide bias strips. Each strip will be about 60″ long.
Step 3: Preparing the Batik
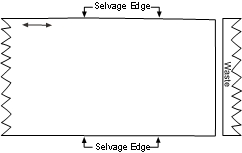
Straighten one side with a cut perpendicular to the selvage edge.

To get a 45 degree angle, fold the just-cut edge to the bottom selvage. Press.
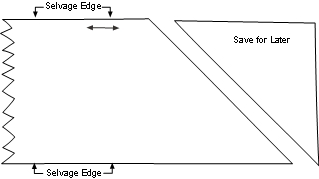
Cut off the fold and set the triangle aside for later.
 Cut a dozen 1/2″-wide strips to get started. Repeat as needed. These strips will be threaded onto the Locker Hook and will be pulled through the crocheted stitches. You’ll be using one strip at a time. Then, when you get near the end, you’ll machine or hand sew another strip to it. I know; this is as clear as mud. Hang with me here.
By the way, the rationale for using batik bias fabric strips instead of yarn or twine is four-fold. First, it fills the space and keeps the crocheted shirt strips from coming out of the canvas. Second, sewing fabric strips together is better than knotting them together which makes the joins bulky and lumpy. Third, bias strips don’t ravel or produce long thready hairs which will get tangled as you work with these long lengths. And fourth, batik fabric is tightly woven so the strips will be stronger than regular quilting fabric of the same width.
Step 4: Preparing the Canvas
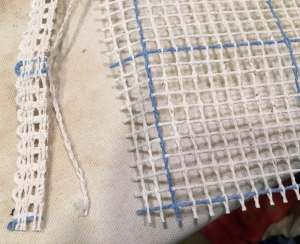 First, you’ll need to square up the canvas. Remove the selvage edge if your piece has one, and trim all four sides so that they look like the picture. All those little pokey things should be just like the picture. (You can ignore the blue lines. You won’t need them.)
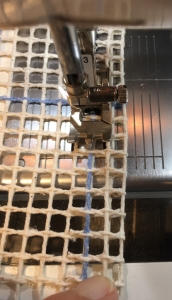 Then, one side at a time, fold over the edge by two rows of “boxes.” Zigzag the fold in place. Use strong thread, any color, any weight, and use a wide zigzag. The object is to have the “boxes” perfectly aligned and to pierce the horizontal lines (pieces of twine? I have no idea what to call them) with the needle when it passes over. You’ll “sew air” when there are no horizontal “twines,” but the thread will wrap around and tighten along the vertical “twines” in the canvas.
Tweezers really help yank the canvas over so the boxes line up.

The more you can line up the boxes, the easier it will be to hook the rug when you begin. If the boxes are misaligned, the area in each box will be smaller and much harder to poke the Locker Hook through and bring the fabric up.
 To reduce bulk at the corner cut through two horizontal “twines” (see photo), then turn your scissors majorly toward the left (a 90 degree angle) and cut through the one vertical “twine” which in the example happens to be blue. You will have removed something that looks like this:
‡

Now fold up the next side and continue on. Do be careful about aligning the boxes. You’re going to have to jam the Locker Hook in every single one of those boxes, including what’s left of that one at the very corner and pull fabric back up through it. Yikes!
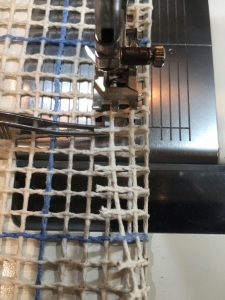
 Once you turn the corner it will look like this. You have folded and secured the canvas edge so that it will not unravel. Continue zigzagging all the way around.

Then, zigzag all the way around a second time, one box over from the fold. That second round will be much easier, except perhaps for the corners. Use the porcupine quill to open the corner box before you zigzag.

It should look like this.
Step 5: Starting the Rug
Find a shirt back with the thinnest, most tightly woven fabric. (I like a dark fabric.) Press it, and cut about about a dozen 1/2″-wide strips.
 With matching thread, join two strips together with a mitered seam, back stitching at both beginning and ending to lock the stitches and to keep the seam from coming apart. Trim the seam allowance to a very scant 1/4″. (That’s why you picked a tightly woven fabric.) Press the seam open.
A mitered join (shown) is less bulky than a “butted” join. Bulk is bad.
Thread the yarn needle. Staring anywhere on canvas except a corner, poke the needle up into a box. Draw the fabric through, leaving a 3″ tail. Poke the needle up and into the next box, wrapping the fabric around the edge of the canvas. Un-bunch and adjust the fabric so that it covers as much of the canvas edge as possible.
As you approach each corner, check to see that the the fabric seam will not wind up at the corner. It would be worth the effort to pick out miter stitches and cut the first strip shorter to avoid having the seam at the corner. Put two stitches in each corner, one for each side.

The porcupine quill will help open the corner box if needed.
TIP: If you forgot to pick a thin, tightly woven fabric for this step, you may want to trim about 1/8″ off the fabric strip as you approach the corner and as you leave the corner. It gets pretty tight around the corners.
The two tails will be tucked under future stitches on the back of the rug later. If you think this is tedious, it is. But don’t give up as soon as you get away from the edge locker hooking actually gets fun. Really.
Step 6: Cutting & Preparing the Shirt Fabric
Use the shirt backs first. (Then, as the rug progresses, chop up the sleeves, and then shirt fronts*.) Fold the shirt backs in half, press the crease and stack two backs. Rotary cut them into 1″ strips. A dozen strips from each shirt is a good start. Cut fabric from 6 different shirts for now. (You’ll be cutting more later, but I know you want to get to the fun part.)
 One could cut strips with the grain on plaid shirt fronts and backs to get longer strips. That is, instead of cutting horizontally across the shirt (imagine the shirt being worn), one would cut vertically. This would not work well on striped shirts as you’d lose the stripe.
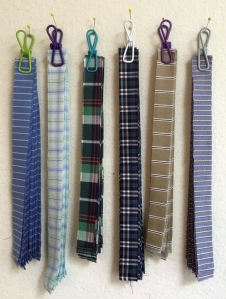 I clip like strips together and pin them to my design wall so I can see fabric choices as the rug progresses. (You can get the cute plastic coated wire clips here.)
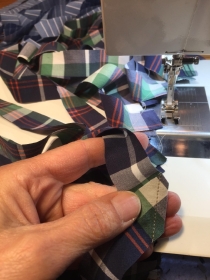
 Chain miter the strips together. Make sure right sides are together and ends are lined up at right angles before you sew through them diagonally. Do not even try to line up the stripes. Use neutral colored thread and dial the stitch length shorter if you’re afraid the stitches will come out. No need to backstitch at beginning or end. Just feed the strips in one after the other. Do one or two colors at a time, or however many you can stand to prep.
For every inch of batik you thread through the rug, you’ll use 3″ of shirt fabric. My finished rug (28″ x 34″) weighs 3 pounds. Seven ounces of that is the canvas. Time to buy more shirts?

 Cut seam allowances to a very scant 1/4″ . Chop off the “ears” (little triangles at top and bottom) as you clip the threads that join the chain.
 Spread the joined strips out on the ironing board, wrong side up. Finger press the seam allowances open. Don’t go crazy, just fiddle with them enough to separate the seam allowances so you can hit several at once with a hot iron. I like steam.
 Fold the long strip in half, wrong sides together, lining up the raw edges as you press. If you’re not getting the fold to stay closed, try steam or a hotter iron. If it keeps bouncing open, it’s probably not 100% cotton.
 Lay the folded fabric in a basket or box to keep it from getting dirty, tangled, or stepped on. You can prep as little or as much as fabric as you want. Don’t do too many at once until you see how the rug looks. You can always revise your strategy on the fly if needed.
Step 7: Locker Hooking! (Finally!!)
There is no “right side” or “wrong side” to the prepared canvas. Start at any corner with either side up/down. Just make sure you continue to locker hook from the same side for the rest of the rug. The strategy for this rug is to go around and around, filling up the canvas from the outer edge to the middle. Skip no boxes; one stitch per box.
You’ll notice in the video that I talk about bringing the shirt fabric around the locker hook one way and then another way to keep the more or less continuous length of pieced/folded fabric from twisting as I work. (Twists can lead to tangles.) You can see how this manifests itself on the back of the rug below.
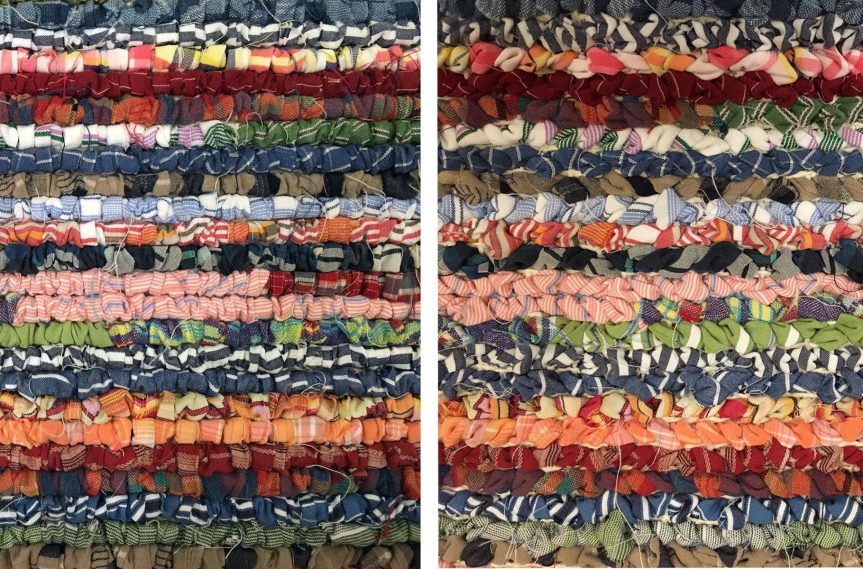 Front Back
Click once or twice (depending on your browser) on the picture above to see a very enlarged image. On the back of the rug you can see little slivers of canvas between the rows. That’s why it’s the back. But, if the front needs a vacuum, my rug goes back-side-up and I get just as many compliments. Unless you’ve got your nose in the rug, you won’t see the canvas.
As you near the end of the 1/2″-wide batik strip in your Locker Hook, you will need to add a new length. Keep in mind that you will have to haul your rug over to the sewing machine, so don’t put this off until you’re down to the nubs. Join the new batik strip to the old with a miter join as you did the fabric used to edge the canvas, shown above. Similarly, when it is time to add to the shirt fabric do so with a mitered join using matching or neutral thread, press seam allowance open, then fold and press as before.
I use a “Manipulated Random” strategy for adding shirt fabric is to a rug. I want it to look scrappy, but I also want the rug to look like a tossed salad—colors and fabrics evenly distributed throughout the entire rug. I also know that alternating lights and darks, helps punch up the colors. So, when I add shirt fabric I do give some thought to what color it will be sitting next to. I don’t like the same exact fabric touching. This is really hard to predict because I don’t really know where one color will end. As I go around and around in concentric squares, the distance to cover is always shrinking, plus shirt backs aren’t all the same width! So, play it by ear. If the next fabric coming up doesn’t look like it will work, I cut and splice.
Step 7: Finishing
Bring thread tails to the back of the rug. Using the yarn needle, tuck them under the shirt fabric stitches. Ta-Da! You’re done! Place your new rug on the ground and jump all over it as you do your happy dance!
*(As an Amazon Affiliate I earn from qualifying purchases.)
See more of my recommendations on my Amazon page, here.


Thank you for the great tutorial. The “how-to” pictures in the books I’ve bought don’t show the steps very well. The only problem I had was with the videos. For the first I had my volume as loud as it would go and still couldn’t hear you. On the second, I had to turn the volume up louder than usual and at times it was hard to hear you. The video of the dog and boy in the car was super! Thanks for all your newsletters. I always enjoy them.
LikeLike
Glad you liked the tutorial. I had trouble with the videos too. I feel very self-conscious on video for some reason (I know, me, the big mouth) …all alone in the house talking to myself. So, I didn’t project as I should have. My apologies. I think the second one was better/louder. Trust me, I didn’t say anything worth hearing on the first one. Sorry for the frustration.
LikeLike
Ah, so that’s what you’ve been up to lately, Ami. Nice work! Loved revisiting the instructions for the “pocket” quilt. Will have to bookmark it. Dulci says “woof” (or was it “bark?”) to Scooter. Hopefully we can visit sometime before moving. And “Hi” to Deb. :-) Mary
>
LikeLike
Thanks, Mary! Tell Dulci that Scooter is very excited about a play date. When is Moving Day?
LikeLike
I have had a locker hooking kit sitting around for ages. Now that I can clearly see the steps I am going to get out all those shirts I bought and get to it. Thanks for the clear directions. Do you like the batik fabric instead of the twine because it fills the loops better?
LikeLike
Yes, and because joining twine requires a knot. Knots are lumpy and bulky.
LikeLike
Thanks for the wonderful tutorial … and all your great newsletters. I learn so much and especially enjoy the humor.
Just a note to add when de-boning shirts… Save those buttons!
When my husband passed a few years ago I took his shirts apart and have started a quilt for our son. They will be background for Celtic knots in the quilt. The buttons went into Christmas ornaments. We are really pleased with the results.
Styrofoam ball base; lots of different pins – corsage to sequin sizes; beads; old jewelry; narrow wired ribbon for bows and hanging loop on top. Use white school glue (or glue of choice) on every pin. Start way ahead of time for results take longer than most plans but results are worth it.
LikeLike
I ordered my kit today and am anxious to get started. I plan to use some of my enormous quantity of quilting fabric that is so old and oftentimes “ugly” that I would never display it in a quilt. Do you see any problem with that, as it seems “thicker” than a 100% cotton shirt? Thanks for the tutorial and great instructions!
LikeLike
Give it a try and let us all know.
LikeLike
The first time I tried to make one of these (many years ago), I used twine. I found myself pulling it too tightly and ended up with a finished project that was no where near square. I can see where using fabric instead of twine might help to eliminate that problem because it helps to fill in any gaps. Now I’m ready to give it another try! Thanks Ami!
LikeLike
It’s still a good idea not to pull to hard. :) Even with fabric on the bias.
LikeLike
Is it ever necessary to join the canvas (to make a bigger rug) to another piece and if so, how to do it?
LikeLike
I haven’t tried that yet, but I would think overlapping the canvas by two rows of boxes and zigzagging them in place would work. If you try it let us know.
LikeLike
Darn it”..I have so many projects already in the works and now I want to make one of these rugs. Too cute, and you gave such a good and detailed tutorial. Thanks so much.
LikeLike
I know. The last thing I needed was another project, but it’s so much fun!
LikeLike
How does this compare to the rag rugs done without canvas, aka “toothbrush” rugs. I’ve made a couple of those and they seemed pretty simple. But I’m thinking this might be more durable, though with a bit more effort. Any thoughts? Great video BTW! Thanks for this great tut. VERY complete! I wonder if I could interest my husband in this…?! ;-)
LikeLike
I’ve never made the toothbrush rug as the directions for those say to work on a table. This is my “relax while watching TX” project and I really want it in my lap. So, I really couldn’t say.
LikeLike
Well, I finally finished my rug (with quilting fabric scraps) and really love it! I just can’t find a place to share my finished photo.
The only thing I really did differently was to use the batik as to whip stitch/cover the edge of the rug ~ I figured that way I could continue with the batik and not have any knots in the way!
I just love how soft the finished project is ~ it started out so stiff but softened considerably the longer I worked on it.
Thanks again for the project, Ami!!
LikeLike
1. I meant to say diFFerently!
2. I used the bias batik on the edge of the canvas because it also cut down on the threads significantly!
LikeLike
Yup, bias anything is the way to go around the edge. It does soften considerably, but I like that it holds its shape so well too.
LikeLike
A very informative tutorial many thanks. Treena from Lake Macquarie NSW Australia.
LikeLike
Thanks!
LikeLike
Best directions ever. Like the idea of using material/batik instead of twine and I definitely want to try gloves. Thanks
LikeLike
Outstanding tutorial Ami! I am going to pull out my supplies and get crackin and stash busting. I will be looking for one of those gloves.
LikeLike
Have fun! Best place for those gloves is the $ store. Maybe a gardening glove would work too.
LikeLike
Where can I buy on line the locker hooking canvas ??
LikeLike
Try JoAnn.com.
LikeLike
Dear Ami,
Thankyou for your easy to follow video. I have made a rug already – it is a little bigger than yours -about 3 metres x 1.5 metres. I had so much fun making it. I used old doona covers and sheets from the op shop. I have just begun another one. I used gardening gloves and they worked just fine.
Thanks again for the inspiration
LikeLike
So glad you’re having fun!
LikeLike
good idea we also should make a rug from recycled men’s shirts It will be useable and less expensive
LikeLike
Glad you liked my idea!
LikeLike
Hello nicee blog
LikeLike
Thank you!
LikeLike