

Kevin MacLeod made a great video showing how to make origami folded fabric ornaments. Thanks to his video I’ve been having a blast making Christmas ornaments! Take a look and then come right back for my tips below.
Ami’s Tips
1. Pre-wash your fabric. I know, I can hear the moaning already. If you pre-wash (and iron) you don’t have to pin anything. Because pre-washed cottons slide less than un-washed cottons.
2. Pick two, freshly pressed, coordinating Christmas fabrics and place them right sides together on a flat surface. If the selvage edges are still intact, make sure they are lined up. If they’ve gone missing, figure out where the straight of grain is and line up both fabrics so that the straight of grain is running the same way in both fabrics.
3. Flip your lid (or your mixing bowl) rim side down and trace around with a super very thin permanent pen. (You read that correctly. Permanent.) Permanent pen lines will be cut off and what little might remain won’t bleed if the pen is permanent. Then trace some more circles because you’ll want to make lots of ornaments. The lines you are tracing CAN TOUCH. In fact, they probably should, so you can save fabric. (You’ll see why shortly.)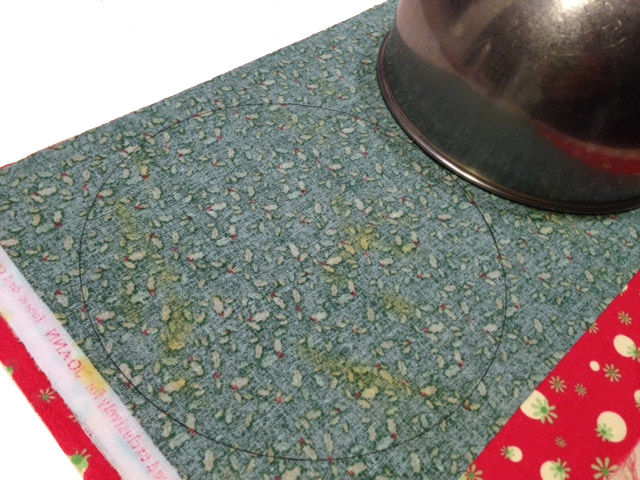
4. (If you didn’t pre-wash/dry you get to pin now. All over. Lots of pins. Nasty, pointy pins. Be careful.) Dial down your stitch length a notch, and sew 1/8″ from the marked line on the inside of the circle. A shorter stitch length and narrower seam allowance make for a smoother, rounder edge. When you turn the disk right sides out, the seam allowance will have shorter and less noticeable pleats. (The marked line is your cutting line.) Go ALL THE WAY AROUND leaving no opening. OH MY! Is she for real?! YES! Do you want to tuck in a 1/8″ seam allowance and blind stitch it shut? Me neither.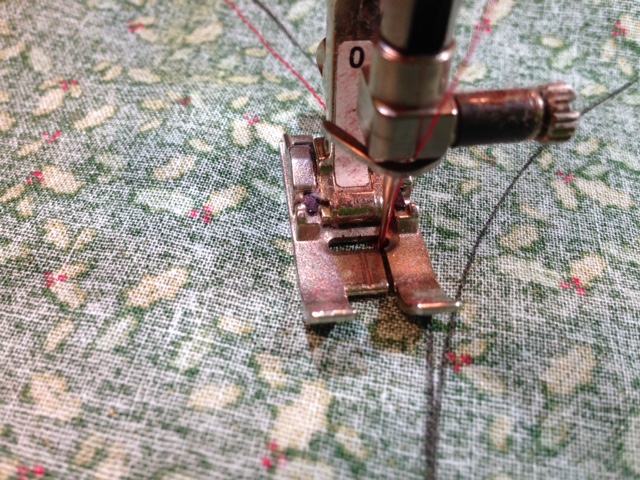
5. Do the folding thing in the video to find dead center. (I know, we’re still inside out.) Mark dead center on both fabric with the dreaded permanent ink pen. I hope it oozes through the fabric because you’ll be looking for the marks on the right side of the fabric.
6. Make a 1″ slit in ONE fabric 1″ away from the marked dead center, like this. The fabric you slit will NOT be the one that slips over the ornament corners. The slit will be on the back of the ornament cleverly concealed by something I have not not yet revealed.
7. Turn disk right-side out. Push out seam allowance with chopstick. Lick your fingers and wiggle the two fabrics back and forth at the seam to draw out any hidden creases. You can also pick them out with a pin.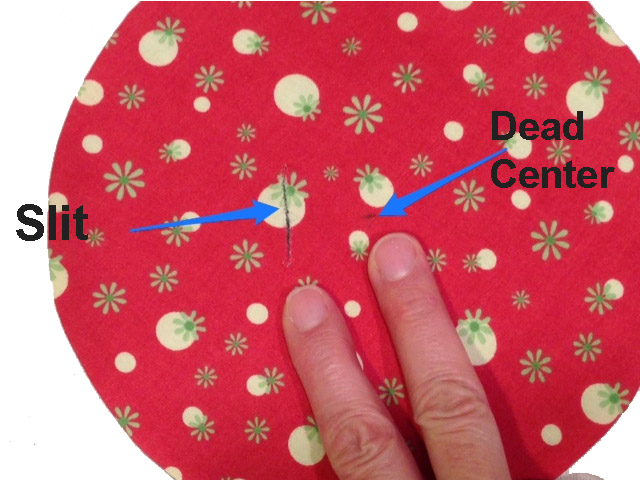
8. Fold disk again, as in the video, to make hard creases that evenly divide it into quarters. (Pins take over for creases in humid weather or if you’re dragging this project around for a while.) Sew a button to the non-slit side, dead center. Shank buttons are the best. If you don’t have a button with a shank, go get one. Or make a thread shank. Sew with stiff, sturdy thread like Coats & Clark hand quilting thread. Knot off the thread after sewing on the button, but LEAVE A VERY LONG TAIL.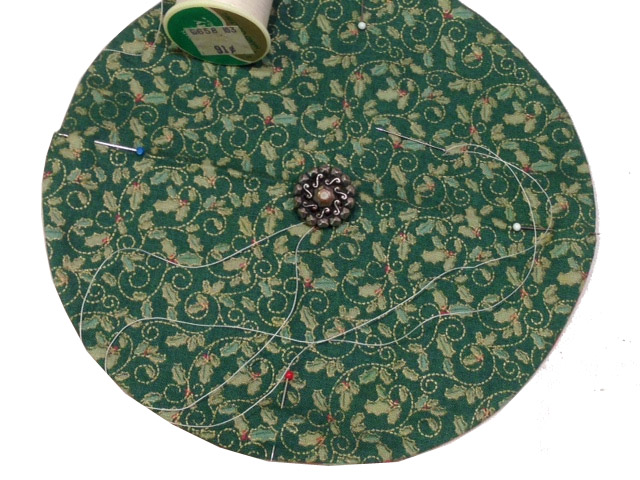 (Can you see how old my thread is? $.91 WOW! And did you notice I forgot to stitch decoratively about 1/8″ from the edge? I think I’m OK with that.)
9. With the thread from sewing on the button exiting the top fabric at the button shank, pick a pin, any pin (or creased side). Spear it just like Kevin did in the video and pull it all the way to the button shank, taut. Take a stitch in the fabric right next to the thread shank to anchor it.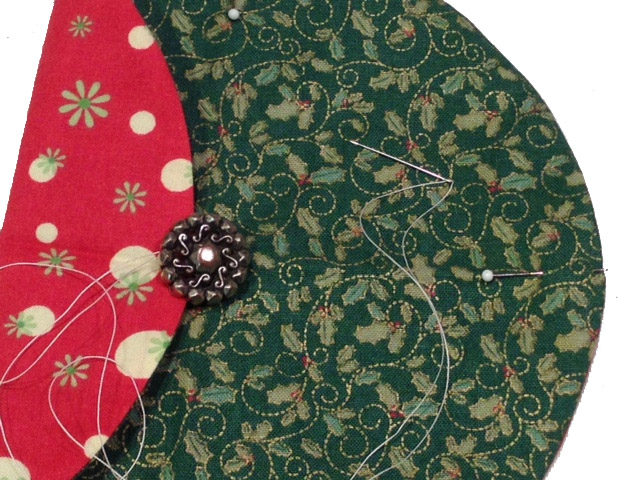
10. Moving clockwise or counter-clockwise (whichever is most comfortable) take a tiny stitch to anchor the thread on the next side of the button very, very near the shank and pierce the next crease. Bring it to the button. Take a stitch as before to anchor it.
11. Repeat with the last two creases, take thread to the back and knot off. You can make as big a mess as you want with the knot on the back. The knot and the slit will be covered.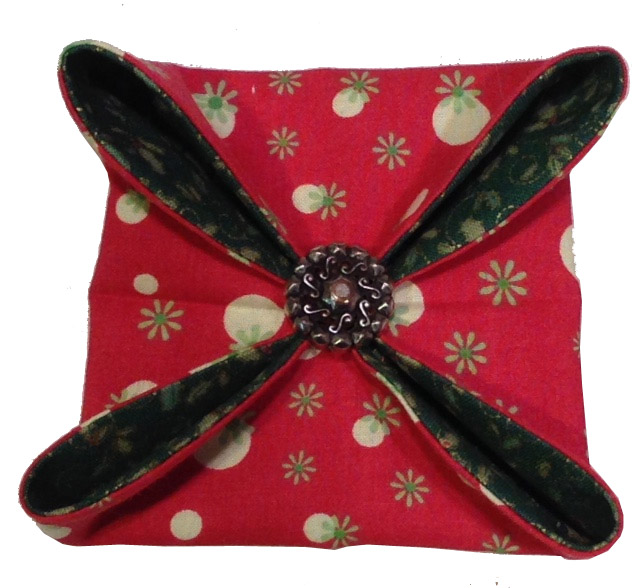
12. Press the sides, then fold over and nail the point with your iron. Steam is good.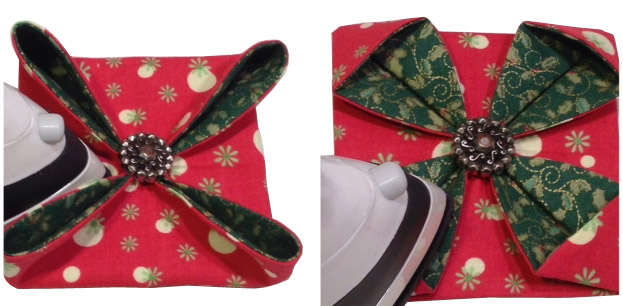
13. Make the final flips like Kevin showed. Press.
14. Flip the ornament over and cut a square of tagboard. The insert will be covered in fabric and inserted down in Step #17. (The following directions show a product I used to sell called Sticky Template Plastic or STP. Sadly that is no longer available.) I would suggest you simply cover one side of the tagboard with fabric.
15. Trim the fabric a hefty 1/4″ beyond the edge of the plastic (tag board).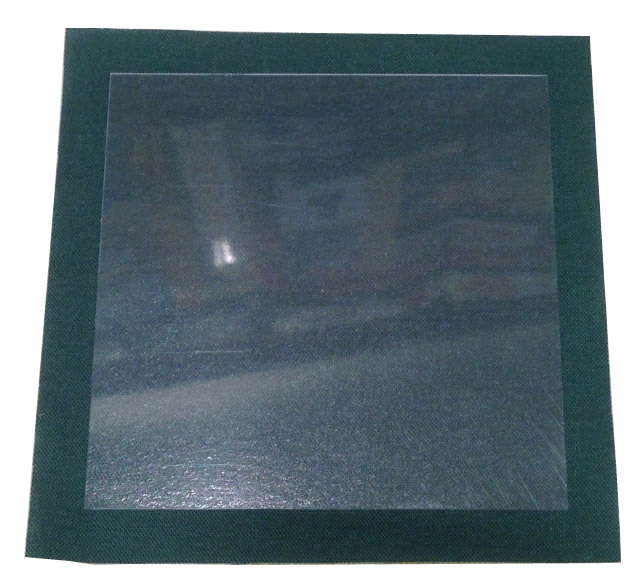
16. Wrap the fabric to the wrong side and tape, glue, or rubber cement the fabric to the tag board. Don’t worry about the mess in the corners.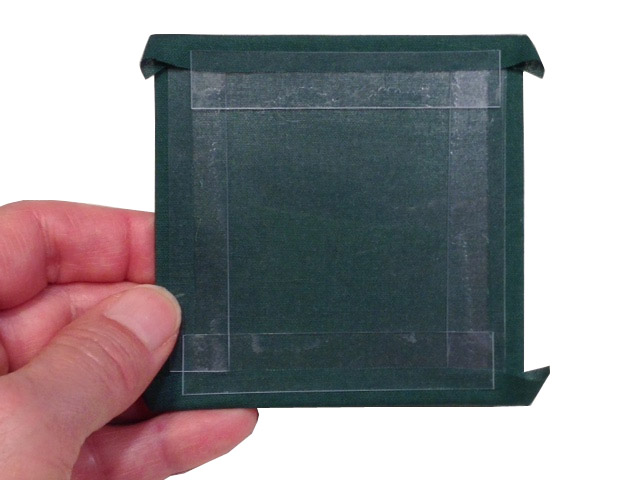
17. Center the insert on the back of the ornament and then finish as Kevin suggested with a hanging cord or thread. The fabric-covered STP tag board straightens up the ornament nicely, gives it a little heft, and lets you dress up the “back end.”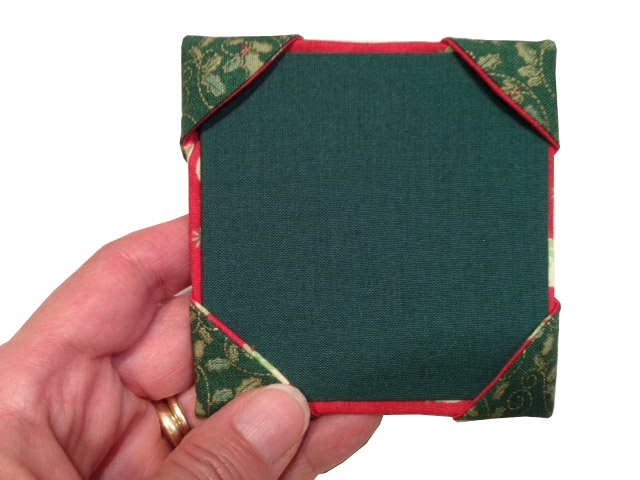
18. Insert something to hang the ornament with, like Kevin showed in the video. I settled on 11″ of red pearl cotton #5 and used a big fat needle.
19. Now what? Use a gel pen or permanent pen to sign and date your ornament, or write a little message to the recipient. Maybe before you slapped the STP on the fabric you could have embroidered something? Next time. Here’s another idea: tape a length of ribbon to the non-fabric side of the STP and tie a gift card to the back of the ornament. See how nicely it tucks into the corners for extra security? Fuse or sew a QR code to the STP insert. Upload a video, photo, or favorite recipe to be accessed with the QR reader on your smart phone.
The original post for this awesome ornament came from a woman in New Zealand. Click here to read Katrina’s Tutorials blog.


I made this ornament with the suggested 7 1/2″ circle and thought it was a bit big for an ornament. It is a very easy ornament but I would suggest a smaller circle…5 1/2″??
LikeLike
All depends on what you like.
LikeLike
I used a 5″ circle to make this ornament. I agree, it looks better to me as a smaller ornament.
Karen
LikeLike
Karen, I’m glad you made the size that looked best to you. Thanks for stopping by.
LikeLike
I like these. I made some last year for Christmas
LikeLike
Awesome! I bet they were a big hit.
LikeLike
Oh, Ami, these are too cute!! Exactly what I needed! What size circle yields what size ornament? Roughly, whatever size ornament you want, make a circle twice as big?? THANK YOU!!
LikeLike
Kind of, maybe, probably…. mine are measuring about 3-1/2″ square. With a 1/4″ seam allowance (instead of my 1/8″ seam allowance) they’ll be a little smaller. A big YOU’RE WELCOME!
LikeLike
Love your tips. You can also cut the slit on the side that slips over the ornament corners (on your example, the green fabric) The slit will be hidden inside the ornament and the back side does not need to be covered.
LikeLike
I’m happy with it on the back, but I’ll try one near the edge just for kicks. I guess I’d have to decoratively stitch around the edge on that one, something I was happy to skip, even if it was accidentally.
LikeLike
I am thinking name ornaments for 2016– these are great! thanks Ami and Kevin.
LikeLike
Glad I could help!
LikeLike
Really like the fabric ornament tutorial and additional comments. Obviously, you have been sewing longer than Kevin. (wink, wink) I haven’t heard of Sticky Template Plastic.
Thank Scooter for the Christmas cheer too. Hope he is out of the dog house (or regains house privileges) soon.
LikeLike
Hi Whiskers. Thanks for commenting. Kevin gets the kudos for presenting the idea in his video. He’s an excellent sewer. I just added my own 2 cents is all. Scooter is smelling much better, so I am accepting kisses again. Thanks for the Christmas cheer. Wishing you the same.
LikeLike
Wonderful tips. I’m going to make some of these this Christmas. I suppose I’d better get a move on though. They aren’t going to make themselves even if I leave all the raw materials near my sewing machine and hope for the sewing fairy to visit.
LikeLike
Did you make them all the same size? Or did you experiment with different sizes? I’m wondering what the smallest feasible size of circle might be…
LikeLike
I followed Kevin’s lead. I did make one much smaller circle, but haven’t gotten around to finishing it yet, so I don’t know if I’ll like making it or hate making it.
LikeLike
I am going to try to make some today! Love the idea.
LikeLike
Thanks, Margie!
LikeLike
I think this will be the perfect activity for the church quilters’ Christmas lunch on Friday. I will see the circles and turn them, so they can just do the hand sewing.
I am going to try cutting them out with my pinking shears to make the turned edge smoother.
LikeLike
Let me know how the pinking shears work. I think that is an excellent idea. I happen to have a crappy pair of pinking shears—way too stiff plus I can’t see where I’m cutting. Anybody have a good recommendation?
LikeLike
Fiskers. I had an old pair that wrapped the fabric around the blades.I got the Fiskats ones and have loved them ever since. They are expensive, watch for a sale or a coupon at the craft store.
LikeLike
Ami! You are a Godsend!! I was trying to figure out what to make to take to nursing homes on Christmas morning. These will be perfect. AND — I don’t think they have to be Christmas only. To me the light color on dark looks like an Easter cross, or an old rugged cross for any other time of the year. Stained glass window colors would still be pretty hanging anywhere too. Thank you!!!
LikeLike
So happy to help!
LikeLike
I made some orgami like flowers for a basket exchange block last year. They look similar, but I never thought of using them for ornaments. I am on this for sure! It may be next years exchange ornament.
LikeLike
Cool!
LikeLike
Guess I’m slow to sew but I made my ornaments yesterday and had a blast. I snipped the circle edges before turning and I didn’t have any trouble getting them right side out. I did the topstitching because I liked the extra touch. Great gifts and fun to make! Thx Ami!!!! PS: LOVE your store!!!!
LikeLike
I loved the way these look, and look not so hard. I made freezer paper templates – worked very slick. I have 2 circles made and working up the courage to cut the slits…. ;)
LikeLike
So glad you are enjoying these.
LikeLike
Can I use an old cereal box or something similar instead of the plastic? Just thinking of a cheaper option if making loads
LikeLike
The Sticky Template Plastic has the benefit of being sticky. It is also sturdier than old cereal boxes which you would probably have to glue on to the ornament.
LikeLike
the site for the sticky plastic no longer works. Where else can we buy this or what is the thickness of the plastic so I can find alternatives?
Thanks!
LikeLike
Sorry….Sticky Template Plastic is no longer available. As a substitute for this project you could use Steam-A-Seam stuck to a piece of cardboard. Then fold fabric around the Steam-A-Seam/Cardboard and insert into the ornament for stability.
LikeLike
I love your two cents, Ami! Your tips make all the difference. My first tries before I found your blog where sad little floppy sloppy things. Your tips make them crisp and clean. Thanks for a game changer!
LikeLike
Thank you!!
LikeLike
I made these from Kevin’s directions but will add the cardboard to stiffen them up a bit. Love the idea of making them for give sways throughout the year. This batch will be for coworkers, but there will be more I am sure.
Yvonne – Maybrook, NY
LikeLike
Glad you liked my tips.
LikeLike